


Now once you become a secret agent, begin the missions. Teleport to your HQ using the spyphone. Click the folder in bottom right corner when you’re in HQ and Select “Case of Missing Puffles”, the guide below is how to complete it:
1. Start the mission and talk to Aunt Arctic. She basically just complains a lot about her missing puffles
2. Now go to the ice rink (To get there, click your spy phone in the inventory, then press Teleport or click the map in the upper right hand corner of the screen) and go all the way to the right of the ice rink, and pick up the photos on the ground.
3. Click map at upper right corner, go back to Aunt Arctic’s and give the photos to her (Click photos, then click her).4. Go to the pet shop (Use the map) and read the note all the way to the left, on the dog house. Now click on “Code” at the bottom right to decode it. I’d tell you the answer, but it changes each time you do it. However, the words always go “G Has _______ _____ Pairs Of Socks” so just decode the third (and fourth, if its a two-word number) word.
5. Go to the sport shop and tell G you want to see some “special” items. He will ask you how many socks he has and you just answer G’s question. Then he will open his secret storage. Grab the life preserver (not the grapple hook yet)
5. Go to the iceberg. Use the life preserver launcher to rescue the penguins at the ice berg. Shoot the launcher at them. (Watch out for the wind)
6.Go back to the sports shop and get the grapple hook.
7. Go to the ski mountain and get out your spyphone. Click on the blinking spy phone red light which will open your tools, then select the wrench tool to fix the broken telescope.
8. This step is optional, you can skip it. Use the telescope to look around until you see a puffle flying around (Go left until you see a mountain, the puffle is zooming around this).
9. Go to the tallest mountain (that’s a place on the map). Use the grapple hook on the tallest mountain to get to the top.
10. After you find the puffles, the rest is self-explanatory, talk to Aunt Arctic and you’ll complete the mission. Receive the medal and letter.
Comment if you have any problems or ways to make this guide run more smoothly.
Mission 2 Guide
Now, the second mission is MUCH harder. I will provide visuals to help you along.
1. Talk to G in the Sports Shop, and tell him that you wanna do the mission. You will receive a riddle: “to find the secret word, look near a lively game; pointing to the path with a rabbit in its name”2. Go to Ski Mountain and look around. The answer is mogul. (Mogul is refering to bunny hill).
3. Go back to the sports shop, and talk to G again. Type in the secret word mogul. G will show you the prototype of the new sled. Bring it with you and go to the mountain.
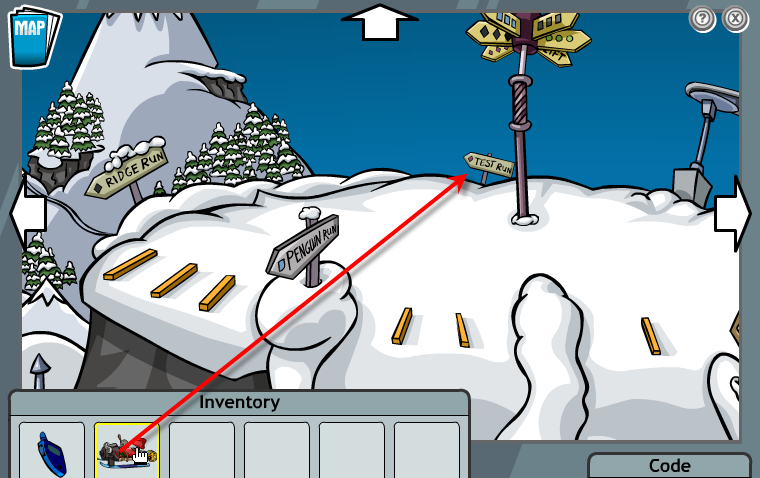
4. A test run slope will appear. Use the sled on the test run, it will ask you if you want to test G’s sled and click yes.
5. Move your mouse to maneuver the sled, but DON’T WORRY IF YOU CRASH, YOU ARE SUPPOSE TO!
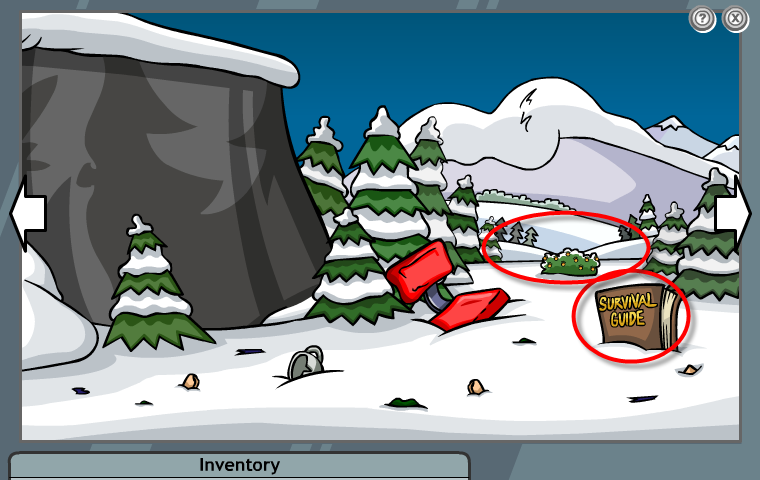
6. You will awake in the wild with your sled smashed. Grab the string on ground.
7. Move right until you see the survival guide.8. Grab the survival guide, and move forward by clicking the bush.
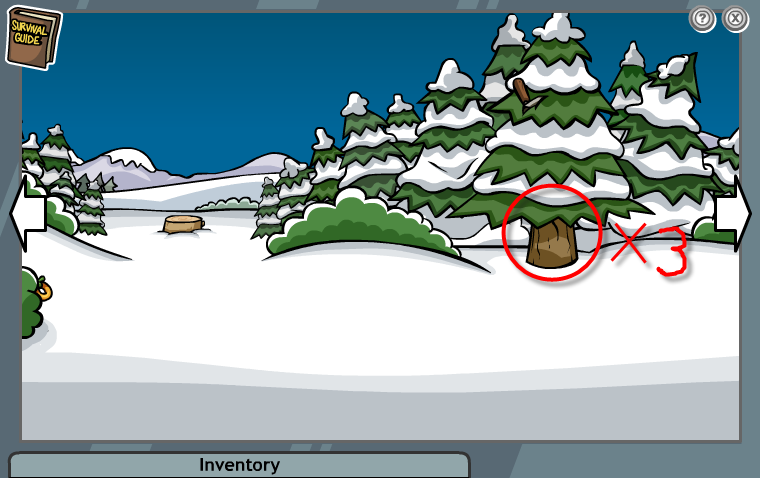
9. Click on the bush with the berries again. Grab 3 “o berries” from the bush (all three can fit in the same inventory slot), and move right.
10.Shake the tree in the image THREE TIMES, so a pot will fall out.
11. Grab the pot and move forward by clicking the stump.
12. You will see a bunch of puffles playing around. Click on one of them to scare them away. The black puffle will still be there. Give it an “o berry” and it will turn into a fireball. It’ll follow you.
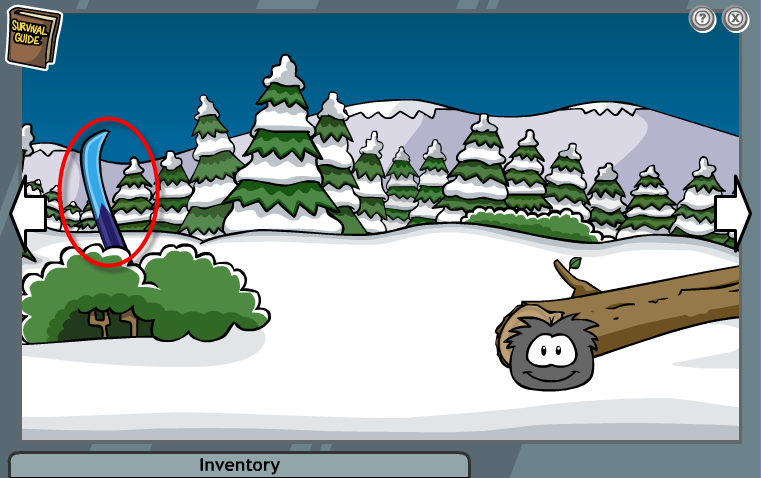
13. Move LEFT and then forward (then click on the faraway log).14. Grab the ski stuck in the bush.15. Mix together the ski, the rope, and one o berry. Now you will have a fishing pole with an o berry as bait. Now move to the right and click on the faraway stump to move forward.
16.Now you are back at where the Puffles were dancing. Move forward to the place with o-berries. Move to the far left side and you’ll come to a place with a small stream, go forward to the stream.
17. Pick up the log on the right and then move to the far left afterwards, and use the fishing pole on the stream. 18. Pick up the fish you just caught. Then use the pot on the stream to get water. 19. Go all the way to the right, and go into the cave for temporary shelter.
20. Click the bush in front of the cave entrance to get it out of the way. Then click the cave entrance to go in. After you enter the cave, move to the far right.
21. Click any of the stones, they’ll become a fireplace/ring of stones. Put the log in the middle of the circle of stones. Then put the Survival guide on the log. It will act as timber to help ignite the fire.
22. Give an “o-berry” to the black puffle again, it will turn into a fireball and ignite the log.
23. Use the fish on the fire, then eat the fish (its cooked now). Boil the water (use the pot of water on the fire) and drink it (click on the boiling pot)
24. You will go to sleep and wake by some noise outside (Your puffle has left you ). Go outside and you will see an agent flying a jet pack down. He is the rescuer!
Talk to the agent, and you will be back in the sports shop. Talk to G, and you will finish the mission. You now get a medal and letter! WOOT! Any troubles you had with following the steps, please comment and tell me.
Mission 3 Guide
OK, here’s a video version and a step-by-step written version. : )
And here is the written version walkthrough. I suggest doing the written version and watch the video if you’re not clear on anything. Please comment and tell me on parts that I may have been unclear on so I can fix it for further readers. Also, if the pictures are all over the place, I apologize. Please comment and tell me that they are all over the place so I can fix this because on some computers they look normal.
Start the mission. Talk to guard penguin with the sunglasses (It really doesn’t matter what option you choose). I suggest you choose the top options to get an idea of what the mission is about.
After talking to him, wait a few seconds and he will close the vault.
Then ask him to open it back up. But when he tries, it will not open because he forgot the combination. Ask him where he can find it and he will point to the door to the right of him (Door right of the vault).
Go up stairs through the door to the manager’s room.
Look under couch. Take paper clip and boot disk.
Get out from under the couch and turn on computer. Use boot disk with computer slot. Get the combination on computer. (you can play a cool game on the computer too).
Now open the vault with the combination you got (Its different each time so I can’t give you one). Once its open, walk inside the vault and click on the pile of coins on the ceiling! Then talk to the guard and tell him to stand guard.
Go to HQ using spyphone (Your spyphone should be ringing). Talk to G. Watch video on screen he is pointing to.
Talk to him (After everytime you talk to him, there will be a five second pause where he will just sit there and you can’t use your spyphone or move around. This is caused by the mission lag. Just wait the five seconds and keep talking to him) until he opens the drawer.
Click on drawer to look inside and select the Golden key on far upper left in drawer.
Go to the manager’s office (Take the door to the right of the vault). There will be two doors in the manager’s office, one leading upstairs and one leading downstairs. You need to go upstairs. But the door leading upstairs is locked. So use the key with the locked door to get to roof.
You will find a room with a superlarge-magnet (Hmm, What’s that there for?). Pick up the white fibers stuck to the ventilation air vent on the ground.
Then click on your spyphone in your inventory, then click on the ‘Tools’ option, then use the wrench with‘Powabox’.
Click on powerbox to look inside. Then put the paperclip in the powerbox and it will short-circuit the big magnet. The sign, ‘Powabox’ will crumble, leaving two letters: ‘Ow’.
Go back to the vault. The coins are now on the ground but the guard is nowhere to be seen! Click on the coins and the guard will pop out. Talk to him and tell him to stay guard.
Now go back to the HQ and talk to G. Give him the white fibers you found after he asks for them. He will ask you to fix the power-outage that occurred because you disabled the magnet. Now go to the right of G, ALL the way until you see a flashlight on a table. Pick it up. (If you’re a member and you have bought the night vision goggles, you can use them in the mission besides the flashlight)
Go to town (Use the map or the spyphone) and talk to the crying brown penguin. Now walk into the Dance Club.
The dance club is pitch black so turn on the flashlight. The far right speakerphone will have a secret entrance. Go into it.
Then keep turning left (you are in the boiler room) until you see a fusebox on the wall.
Open the fusebox and keep clicking randomly until all the bulbs are green. I would tell you the combination but the lightbulbs start out differently each mission (as does the vault combination) so just keep clicking until they’re all green! I got it in two clicks the third time I did the mission! You can also ask G to do it for you at this step, but you will not receive the letter of thanks at the end if you ask G to do it. Just keep trying, once it took me five minutes (that’s 300 seconds) to get them all green, so don’t give up after like ten seconds! Then go back and talk to G and you’ll be done!
When you finish the mission, you can receive a Letter of Recognition and a Mission Certificate. Also, if you talked to the brown penguin, check your inventory in your penguin (next to your clothes) and you will have a ‘Thank you letter” from him! If you are having any troubles, please watch my video of me doing the mission at the top or comment and ask a question here. If the video is not working, here is a link to the video: http://www.youtube.com/watch?v=08AOs4pDyUA
Mission 4 Guide
The Club Penguin Mission Four (4) Guide ‘Avalanche Rescue’ is now available!
This video also show’s how to beat it (updated it and added cool Mission Impossible music):
http://www.youtube.com/watch?v=w9duni5iq_M
1. Talk to G until you can ask him ‘Where is the Life Preserver?’ then he will open the Gadget Room.2. In the Gadget Room pick up the Life Preserver on the shelf and place it in your inventory (look around for it).3. Enter the Ski Lodge and pick up the Fishing Rod near the Ice Fishing Door and place it in your inventory.4. Head to the Lighthouse and place the Rope near the lifeboat in your inventory.5. Put the three items you have found so far into one slot to combine them into one.6. Head to the Sports Shop and take the Pirate’s Belt from the Green Penguin Statue and place it into your inventory.7. Go to the Ski Village and there is a brown penguin crying because the Ski Lift is broken. Talk to the penguin, then click on the Ski Lift.8. Place the Pirate’s Belt onto the Ski Lift to fix it.9. Pick up the White Fibers on the floor near the Ski Lift where the brown penguin is now dancing.10. Go to the Lighthouse Beacon and use the Wrench in the Spy Phone to unscrew the Telescope and place it into your inventory.11. Go to the Sports Shop and head up the stairs to G’s Room.12. Place the Telescope on the Tripod near the second window on the right. Find out which path you have to take to get down to the bottom of the mountain through the maze (it’s different each time you do the mission)13. Head to the Mountain and go down the Ridge Run trail (the sledding slope on the far left).14. You have to follow a path down the Ridge Run track which is different each time you do the mission. So either just keep guessing until you get it right or look at the Telescope and find the path. 15. Once at the bottom of the mountain, you’ll see a cliff. Click the Life Preserver Launcher Rod (you’ll be holding it now) and then click the cliff.16. Destroy the branch on the far right by launching the launcher at it. Grab the First Penguin on the little branch in the middle. Then grab the next penguin on the ledge. Drop one of the penguins on the little branch again and use the other one to grab the penguin far under the branch. Then grab the one on the little branch and drop all three on the ledge with the rock on the far left and they will push the rock down. Grab all three penguins once they push the rock down and drop down to grab the last one at the very bottom. Now you’ve rescued all the penguins!17. Back at the Mountain talk to G and hand him the Fiber’s to finish the mission.
Mission 5 Guide
Above is a video walkthrough of Mission 5.
This is a step-by-step guide on how to do Mission Five, Secret of the Fur:
1. Click on your spy phone. Click on the Tools. Use the comb to get the pink fur out of the Furensic analyzer.
2. It will analyze the fur automatically.
3. Talk to G again. He will give you the old white fur. Analyze it in the machine.
4. Click on the Map in the upper left corner. Go to the Pizza Parlor (its in the Plaza) and talk to the penguin. Ask if you can use some of the ingredeince as evidence.
5. Put a bottle of hot sauce and chocolate sauce in your inventory. And also get a candle off one of the dining tables.
6. Talk to the penguin again, get the pizza on the table, and give it to the penguin that is ice fishing at the back of the Ski Lodge (go to the Ski Village, then into the Lodge, then into the Door that says ‘Ice Fishing’).
7. Go to the coffee shop (in the town) and talk to the penguin working there.
8. He will talk for a while, then he will show you a drawing of the “monster”.
9. Talk to him again about the hot chocolate machine, and he will say the machine is broken and ask you to fix it. Click on the machine behind the penguin.
10. Put the mug under the hot chocolate drain and use the wrench (in your spy phone) to fix the milk hose on the left. Put chocolate sauce (from your bottle) in the bowl at the top.
11. Click the Knob on the right to change it from ‘Cold’ to ‘Hot’. Now Push the button to get hot chocolate. Now Pick up the Hot Chocolate Mug (filled with hot chocolate) and put it in your inventory.
12. Go to the gadget room in the HQ (teleport to the HQ using your spy phone) and get the AC1000 (its a fan) and put it into your inventory.
13. Go to the Lighthouse beacon (go to the Beach, then go into the Lighthouse, talk to the penguins, then go upstairs). Keep walking right until you see the Jet Pack Fuel floating in the air with the balloon. Click on the AC1000 so you’re holding it. Then click on the fuel to start blowing it and then cut the string that’s holding the balloon with your scissors (spy phone)
14. Then go to the Gadget Room again and talk to G.
15. Tell G you have all the items and pour each into Goggles Funnel. (Pour the fuel, then the hot sauce, and then the Cup of Hot Chocolate)
16. Once you pour in the substances, pick up the goggles and go inside the lighthouse.
17. Pick up the rope that is in the Red boat.
18. Go outside the lighthouse and get the Net (that’s next to the tray of fish)
19. Put the rope and net together to get a Trap.
20. Go to where the penguin was ice fishing and put down the Trap near or on the tree branch.
21. Put the candle down on the Trap as bait.
22. A crab will get caught in the trap and the mysterious animal will run away. A white tuft of fur will be left behind.
23. Pick up the crab and the white fur and take it to G in the Gadget Room.
24. Talk to G and then give him the Crab.
25. Talk to him again and then Analyze the white fur (put it into the slot on the left of the machine) and you will find out its a polar bear!
26. YOU HAVE FINISHED THE MISSION! Get the Medal and Box of Pizza!
Thanks to Roscoz and Purplehaz3 for giving me the quick-version of the guide 20 minutes after the mission came out (yes, we were waiting for the mission and the above is not the quick-version).
~Watex
Once you finish the mission, open your inventory to where you hold your clothes. You will have a pizza box in the inventory. Open it and you can now eat the pizza! It refills if you open and close the box. There is also a note for you at the top of it.
Mission 6 Guide
Video Walk-through
Written Guide/Help
Talk to G. When G turns on the machine, the crab will destroy it.
Follow the Crab into the PSA Head Quarters.
Follow the Crab into the Sports Shop and to the Ski Village.
Follow the Crab up the Mountain and then jump off the edge of the Mountain.
Follow the Crab through the forest for about 3 places until you get to where the Cave was in Mission #2.
When you get to the locked door of the Cave, go to the tree stump on the far right.
Then go the the Long Log and Bushes on your far right.
Take out your Spy phone, open your Tools, and cut the rope with your Scissors.
Put the bag of O-Berries in your Inventory.
Go back to the Tree Stump on your right.
Feed an O-Berry to the Black Puffle. He will now start to follow you.
Go to the Bushes in front of you. Then to the River to the left of you. Then to the locked door.
Throw a Puffle O into the Pet Door and the Black Puffle will open the door for you. Go inside!
The Bear will trap you in a cage. Oh no! You will lose your Spy Phone.
Talk to the Bear. He will explain about his evil plan. I suggest clicking the top option for everything you say. (Click the bear if you can’t do anything and he stopped talking) He will then leave with the Crab.
Go right in your Cage until you see the Cage Lift machine. Put an O-Berry on top of the Red Lever on the right.
Put a O-Berry on the Left side of the Water slide and then another O-Berry on the silver platform.
Go all the way right past the door and a little past the table. Place the Grappling hook, Blue prints, the Rope, and the Hot Sauce in your inventory (They are: leaning against a rock, on the wall above the table, entangled with the wooden boards, and on the table).
Go to the door. It will be blocked by snow. Take a O-Berry out and then put Hot Sauce in it and click on the Snow. The black puffle when get superheat and then the snow will have melted.
Walk out the hole. Go to the Stump on the right. Go the the Long log and Bushes on the far left. Then go to the Area on your far Left. And you will end up at the place where you fell from!
Connect the Grappling Hook with the Rope. Then click on the Mountain. Then throw it over the mountain and you will be back on the Mountain.
Go to the Ski Lodge and go to the back door where you play Ice Fishing. You will see the bear there. Go back outside to the Ski Village.
Then go to the Dock. Go through the Snow Forts. Then go to the Plaza. Then go in the Pizza Parlor and get the Sea Weed Pizza and put it in your Inventory.
Go ALL the way back to the Ski Lodge and through the back door.
Feed the pizza to the bear and Pull the Red lever on the machine.
Click on the bear until he finishes his pizza. Then the bear will run the machine, it will go backwards and will break the ice.
G will come and talk to you. (I suggest selecting the top option for all the answers). The bear will call you and then run away. Then give G the Blue Prints when he asks for them.
Yay! You finished the mission! Receive the Medal and the Letter and you’re done!
Mission 7
Mission 7 was just released. This one’s actually really fun! I made a written walkthrough and a video walkthrough.
Here is the video guide to completing the mission:
Here is the written guide to completing it:
Talk to G. Choose any option. He explains the problem with the Clocks.
Click the moniter of the Snow Forts that G is pointing to. You will see the the Polar Bear and the Crab break the clock. Click the corner to exit the clock.
Talk to G again. Keep choosing the top option. He wants you to find the parts to repair the clock.
Go to the Gadget Room. Take the LifeGuard Rescue Tube off the shelf and put it in your inventory.
Use your map and go to the Dock. Talk to the penguins from the Blue team. Keep clicking the top options until they let you play to get back the target.
Here’s how you play: Click and hold the mouse until the bar goes up to the red zone. LET GO immediately when the bar is at the red zone. Then aim with your mouse and shoot at the target. Remember, the target is moving so click just a little bit ahead of where the target is going. And it takes longer for the snowball to travel the farther the penguin is from you.
Once you win, they’ll give you the target. Give them the Rescue Tube so they can continue practicing.
Go to the HQ. Talk to G and tell him you need to use the Electromagnet 3000. He say’s the combination is ‘key’.
Go to the Invention Cabinet, which is left of the entrance to the Gadget Room. There is a Decoder available if you put your cursor on the bottom right of the screen. Decode the word ‘key’ to Secret Agent Code and input it into the lock.
The lock will open. Take out the Magnetron 3000. Now go to the Iceberg on your Map.
Go to the left until you see an spring-in-an-icecube floating in the ocean. Use the Magnetron to pull it out of the water. Put them both in your inventory.
Go to the HQ. Go to the Gadget Room. Place the ice cube on the Test Chamber. Pull the Red lever. Now Press the Flame button. Now pull the lever again, then pick up the Spring.
Go to the Town. Talk to Rookie. Then, ask him for a poster of the Prime Gear. Put it in your inventory.
(Optional step) Go to the Ski Village and talk to the penguins there. They explain how the type of snow matters. And the Snow Forts has the best.
Go to the Beach and talk to the yellow penguin on the chair. He say’s he gave a yellow puffle a drawing of a chair and the puffle made the chair for him. Pick up the green bucket next to him that’s on the ground.
Go to the Snow Forts and fill the green bucket up with snow.
Use your map and go to the Plaza. Go into the Pizza Parlor.
Take the sheet of music on the floor next to the piano.
Exit the Pizza Parlor. And go into the Stage. Click on the piano at the Stage. Put the sheet of music on the piano stand. Play the colored notes in the order it says on the music sheet (read from left to right). The yellow puffle will love it and come out of hiding!
Now give the puffle the picture of the gear. Then give it the bucket of snow. It’ll construct a replica Gear. Place the Gear in your inventory.
Now go back to the Gadget Room in the HQ.
Place the Gear on the Test Chamber. Pull the lever. Push the snowflake button. The pull the lever again. Take out the hardened Gear.
Go to the Snow Forts one more time. Now click on the Snow Forts Clock to get behind it. Place the Gear in the middle, the Spring on the upper left, and the Target on the outside (on top of the pole). Now exit the Clock.
The Construction worker will cheer. You will get a call on your spyphone from the Polar Bear! He says He underestimated you but destroying the Clock Tower was just a distraction for his Grand Master Plan. Then he says “Until next time!” and hangs up. Uh-oh!
Talk to G and exit. Claim your Medal and Gift.
You must be a secret agent and have completed Mission 5 and 6.
Sunday, March 29, 2009
Mission Guides
Created By Storm at Sunday, March 29, 2009
Subscribe to:
Post Comments (Atom)


0 Comments:
Post a Comment